Showing posts with label Katie Denham Interiors. Show all posts

Monday, October 10, 2011

Launching New Katie Denham Interiors Website and our Book Winner!


I was sitting on pins and needles all weekend......I checked this morning, and it had not happened yet...... I checked this afternoon and it is up and running!

The new and improved Katie Denham Interiors website has officially launched! 

I created my first website in a flurry when I started my own design studio 4 years ago now.  I have been in the design business for such a long time working as the principal designer for other firms, but the recession forced some changes, and I decided to start my own studio. It was scary to start a business in the economic climate we are in right now, but also very exciting. I was very fortunate to have wonderful clients who were with me all of the way...referring new work and remaining good friends. It is hard to believe four years have gone by already. It is cliche to say it, but it really does "seem like yesterday" that I hung my shingle.  When I first started, I really did not have much in the way of photography for a website. It was quick, and honestly a bit rough. So........

I am very excited about the fresh new look and am looking forward to adding new projects in the months to come. There are many details to wrap up before a project is ready to photograph, and I am in the midst of    getting a few projects ready right now. There will also be a few more menu items as things progress as well.

I hope you will stay tuned as things come to fruition!

Many thanks to my very talented website designer!

......................................

Thank you all so very much for reading katiedid!
I look forward to reading your comments every day.

Now....on to the winner of the GIVE AWAY of THIS fabulous design book!


Congratulations to Callie Grayson of the blog, 

Hop on over and say "hi" to Callie and visit her blog. You can see her home and the progress she is making, her DIY projects and favorite recipes.

Thank you all for entering, and there will be another GIVE AWAY very soon!

Thursday, September 22, 2011

Marin Designers' Showcase on You Tube!


I am so excited....the Marin Designer Showcase is on YouTube. You can catch a glimpse of what is to come. I feel honored to be a part of it!

Hop on over to the Marin Designer Showcase website for the latest!

Monday, August 22, 2011

The Light Stuff


Many of you may be familiar with Lumens Light and Living, a fantastic resource for lighting, as well as for modern furniture, accessories and area rugs. I have been lucky enough to have been working with them for many years as a resource for my design projects, and more recently they have become a design client of mine!

I have had a blast working with the team at Lumens to design and stage the sets for their ad campaigns for the last year, like the one above. The ads have been shown in Elle Decor, Dwell magazine, the New York Times and the Wall Street Journal, as well as local media. I couldn't ask for a better client or a more creative team to work with.

I recently sat down with Susan Purdy, who writes the blog for Lumens which is aptly named The Light Stuff. I am privileged to be in their designer spotlight this month! 

I hope you have a chance to hop on over and take a peek at Susan's blog post on the Light Stuff HERE. You may just find you will want to catch up on all of The Light Stuff!

Monday, May 9, 2011

Land Park Garden Tour - Garden Staging


 Last Saturday, I had the great pleasure of staging a beautiful garden for the Land Park Garden Tour here in Sacramento. It was so much fun to bring together all of the finishing touches to an already gorgeous garden. And it doesn't hurt when the home owners are a gracious and fun loving young family.

In my previous post, I described the process of how I decided on the elements used. As promised, here is the end result! I hope you enjoy....

Seating area under the pergola


The sheers added a romantic feeling and also help create a more intimate setting.

White lilies, light and dark blue delphinium, and olive branches make up the main elements in the floral arrangement


The table settings included turquoise glazed plates that remind me of watercolor paint.  I added bundles of paint brushes as a nod to the Crocker Art Museum's upcoming American Impressionist exhibit opening May 15th. One of the paintings to be shown in the exhibit  is Woman Sewing in a Garden by artist Louis Ritman. I made multiple bouquets  in different size glass vases in shades of blue, white and green that were inspired by the painting's garden of flowers and vegetables. 


Upcoming.....Highlights from the Land Park Garden Tour and the Curtis Park Home Tour!

Tuesday, April 26, 2011

Curtis Park Home Tour: A Kitchen by KDI, a Peek

 Spring means a flurry of house tours, decorator showcase tours and garden tours....all of which I plan to attend this year! First up this season is a home tour in my own neighborhood: The Curtis Park Home Tour. My own home was on the tour a few years ago right after I had finished my kitchen remodel.

This year I have another kitchen on the tour! Katie Denham Interiors designed a new kitchen for a young family here in Curtis Park, and they decided to put the home on the tour. I thought you might like a little peek! I still have some staging to do for the event, which is this Saturday.
I wish I had better "before" pictures for you because we reconfigured the space while staying within the original footprint of the house. There was a doorway and small hall leading to the Laundry room which I closed off to allow a spot for the new refrigerator. I opened up a new doorway through the eating nook with a French Pocket door. There used to be a doorway between the kitchen and nook, which I opened up making the space much more open, and the kitchen larger as well. 

The Curtis Park Home Tour is celebrating its Silver Anniversary this year. It has been an ongoing tradition for 25 years. Tim and I moved to the neighborhood 19 years ago this month, right before the birth of our oldest daughter Hannah. We had a little 3 bedroom house that we fixed up before moving to the house we live in now...which we are still fixing up! We waited a few years before we found another house in Curtis Park to move into. By that time we had aother daughter and one bathroom....it was time to to find a bigger house....but moving away from this wonderful neighborhood with its historic elm trees and huge Sycamores, the parks, the houses built from the 1910's through the 30's and 40's was out of the question. So waited patiently.

Curtis Park is a neighborhood like no other. There is a sense of community you will find in very few other places. There is a strong tendency toward historical preservation, and this is reflected in the Home Tour. There will be vintage cars parked along the route, and a talk given about the history of the neighborhood. The houses on the tour reflect the architectural history of the neighborhood. The tour is less about decor, and more about "home" and what it means to the generous neighbors who have leant thier houses to the tour this year.

I think the thing I look forward to most about the tour is getting out in the beautiful Spring weather and seeing all of my neighbors and friends.

For a great article about the Curtis Park Home and Garden Tour by the Sacramento Bee, Click HERE.

For More Information and Online Ticket Sales, click HERE

Monday, April 4, 2011

4 Ladies and a Chair

Let's say a dear departed Aunt Sophie has left you this beautiful Louis XVI style slipper chair in her will (or perhaps it was six of them!)....what would you do with it/them? 

Cristin Priest from the Simplified Bee blog posed a similar question to four designer/bloggers and the results are as varied as the bloggers. Cristan asked the designers to create room design using this chair and whatever else took our fancy. I was one of the participants and had so much fun letting my imagination run wild. I put together a moody blue room with white accents and a fantasy of accents. The other designs are creative and so pretty.

To take a peek at all of the "what if" designs, hop on over HERE

And on another note...don't forget to enter the Give Away for Kelly Hoppen's latest book:


Get all of the information HERE!

Tuesday, March 1, 2011

Master Bath Before and After

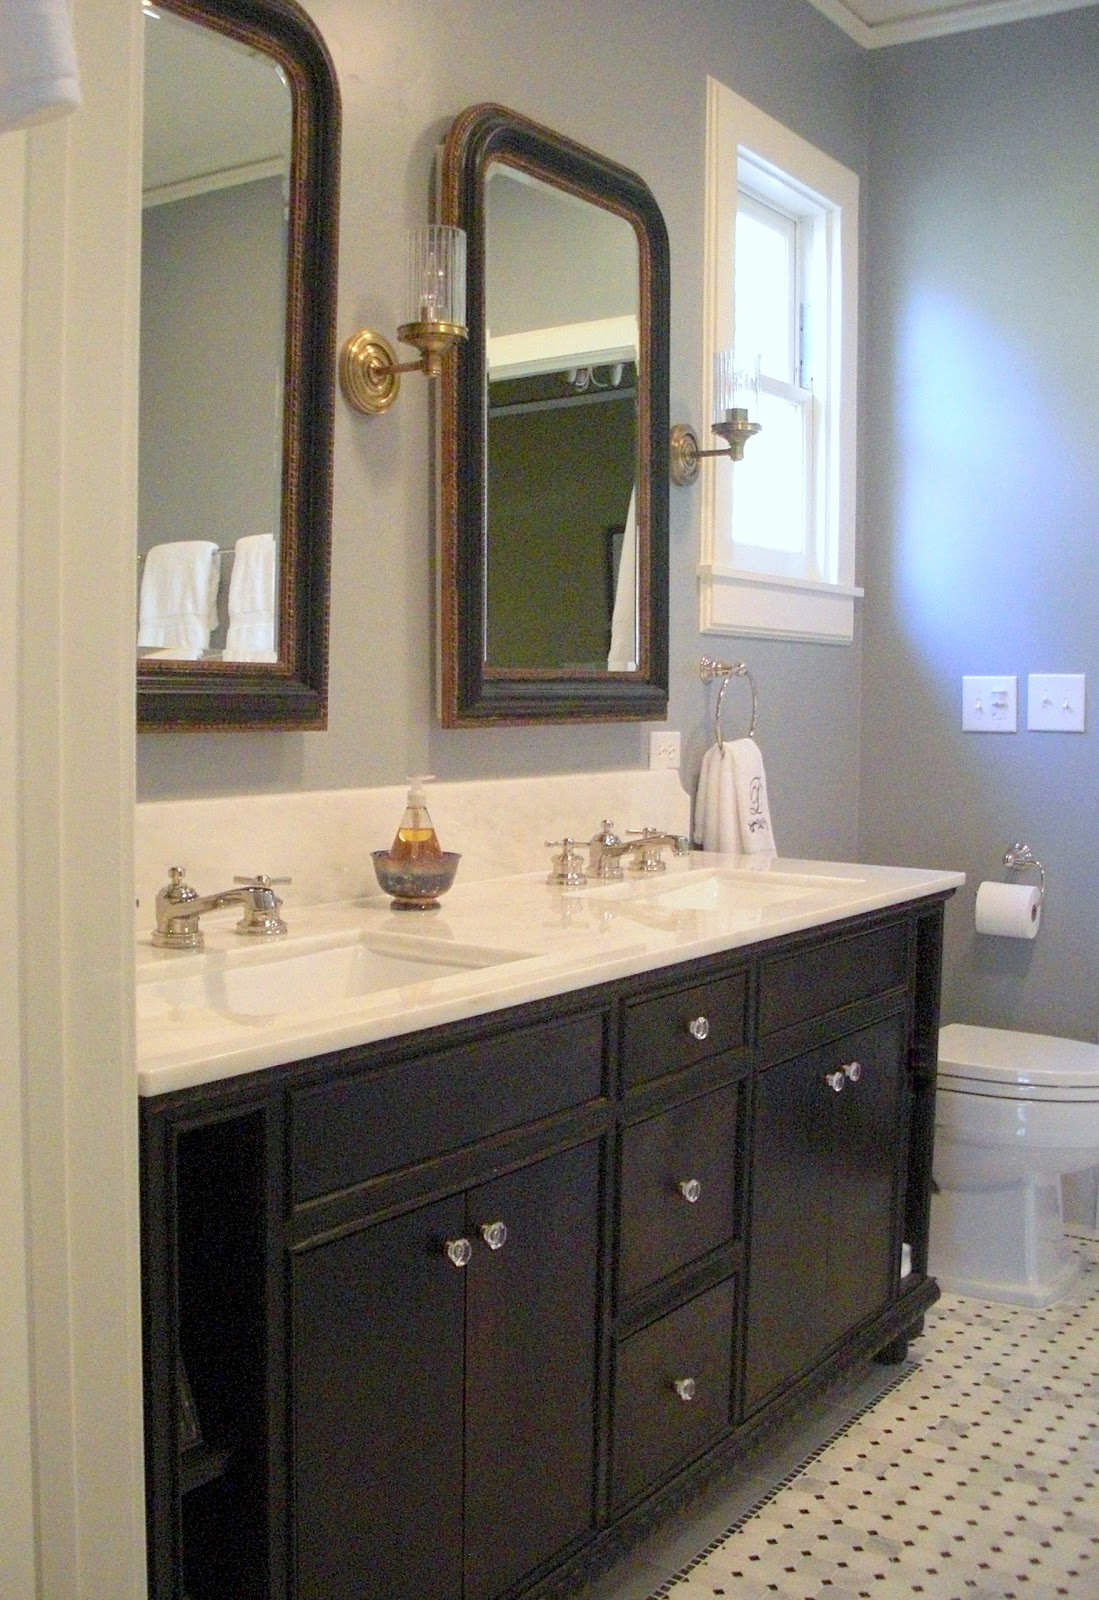
 Design projects always looks best when photographed professionally, but I was so pleased with how a recent project turned out, I had to share a little "before and after" peek. I am blessed with really wonderful clients, and the young couple who own this house are no exception. We are working together to refresh all of the interiors while the exterior is also getting a facelift. The Master Bath is the first room to be completed.
The house was built in the 20's and the original bathroom was in need of an update. The goals were to add storage, expand the shower if possible, and create a fresh, classic, and pretty bathroom. I was also asked if two sinks would fit.

I created more storage with a custom made vanity, and also by fabricating medicine cabinets using twin mirrors from Restoration Hardware. I chose antique brass sconces and ceiling mounted fixtures from Circa Lighting, the finish picking up on the gilt detail on the mirrors. There was even a little drawer in between the tub and shower. Classic Polished nickel plumbing fixtures, Calacutta Marble Counters, and marble mosaic floor finish off the design. Thanks to a very talented contractor, Eloy Tapia of GTO Construction, everything came together beautifully!


 Here is a little peek at the "before", actually very nostalgic and cute (check out the sweet little vanity!), but very "dysfunctional":
 By relocating a window to over the toilet, I was able to grab more wall space for the medicine cabinet mirrors.
 We were able to reuse the tub, which was resurfaced. The shape was irreplaceable and actually left room for a larger shower, as well as room in the budget for the beautiful finishes!
 The wall around the shower was replaced with frameless glass and enlarged, making the whole bathroom feel much larger.
Best part? Very happy clients!!

There are a couple of details to finish up: art and accesories, and window coverings. When it is all done and photographed by someone who is better with a camera than I, I will give you an update!!

Thursday, February 24, 2011

Katie Denham Interiors on Bath Crashers

My plate has been very full of late, and I do apologize for not posting sooner! Last Monday night was the airing of  a Bath Crashers episode which featured a Master Bath I designed for the show. As I mentioned, it was a very interesting learning experience to see how a show like this is put together.

As a designer, I typically have a client who has a budget, a wish list and a particular style in mind. In the case of the Bath Crashers show, the client was not the home owner. I did get the home owner's input, but really the show producers and the host of the show, Matt Muenster, were my clients. And there is no budget. That's right...no money. All materials had to be procured from vendors who were kind enough to donate their products. Another challenge was that, since Bath Crashers is all about the DIY, I was charged with thinking about projects that could be done by the home owners.

So, how does one approach a design when all of the materials and fixtures are to be donated? Well....the design began with the layout of the space, which is par for the course. But when it came time to specify materials, it got a bit more tricky. I would give my ultimate "wish list" to the producers, and they would in turn approach the vendors to see if they would be interested in working with the show. If not, it was on to the next vendor.....and a new tile design for floors, shower walls and counters, and new plumbing fixtures as well. Luckily, I had Toto at the top of my list for providing the toilet (they have excellent products!).....and lo and behold, they had just come out with a new line for the other plumbing fixtures that they were anxious to promote. Hello cool faucets and shower trim! And I have to say, the sinks are gorgeous! Caesarstone was also on my list as a counter top material that is maintenance free (the home owners loved that!), and they came through with the counters. We were almost home! The hardest thing to procure was the flooring and the shower tile. It took several designs until a wonderful company by the name of Jeffrey Court stepped up and provided beautiful marble tile for the floors and a Moroccan patterned glazed mosaic wall tile for the shower. 

One of my very favorite sources for affordable lighting (and lots of other fun things!) is a company called Direct form Mexico. They provided the star lantern which I just love. The pendant lights at the sink was one of the DIY projects I came up with. I started with hurricane lanterns from Restoration Hardware and had the homeowners turn them into pendant lights by wiring them with lighting kit available through any hardware store. They painted the cord black, and the ceiling plates we got through Direct From Mexico.

So, I started with the "after" shots, but what did it look like "before"? If you got to watch the show, you already know, but for those that didn't, this is the best shot I took of what the room looked like:
There were old oak cabinets, no floor due to a recent flood, brass fixtures, lighting and shower enclosure, and that funny little plant shelf in the corner. Oh....and perhaps it's just me, but in the eighties and nineties, there was this feeling that Master Bathrooms needed to be open to the Master Bedroom. I never understood that. If my husband wants to get up and use the bathroom at 4:30 in the morning, and I want to sleep until 6:30.....please give me a door to the bathroom!!! The home owners were thrilled to be getting a new bathroom, and a new door!
After my design was complete on paper, I did a sketch so the home owners could give final approval. I think the final result looked pretty close to my sketch:

It was my favorite part of the show when the host of Bath Crashers, Matt Muenster, unrolled my drawing and showed it to the owners. (My next favorite part was seeing my name first up in the credits!!! Just a little thrill for the day).

So a little behind the scenes peek:
I came on the last day of shooting after demolition, framing, rough plumbing and electrical had already been completed. Tile had also been done. The Master Bedroom was cleared of all furniture and turned into a staging area for contractors and their supplies, as well as the producers, cameramen and sound technicians. I have to say, everyone was so much fun the 12 hour day flew by.
Matt Muenster, the host of the show is there for the days of filming, and as soon as this shoot is done, he is off to the next shoot. Here he is installing the automated mirror glides that reveal the hidden TV:
Meanwhile, counter tops are being completed outside in the driveway area:
The troop from Holmquist Glass were ready and waiting to install the shower glass:
And here they are hard at work:
The wall cabinets were painted by the home owners the previous day and ready to install:
The whole process was filmed all day long, as well as the previous few days....all to be edited down into a half hour show.

I came in to do the final staging and "fluffing" of towels at the end of the day, which turned out to be about 7 or 8 that night. The crew was getting their final shots and then there was the break down and clean up....we were there til the wee hours....a very long day. But we were very well fed, and it was so much fun, I barely noticed. 

The final product with Matt Muenster:
And the happy new Master Bath owners:

The end result turned out to be very fresh and pretty:

A big THANK YOU to the team at Idea Factory, Bath Crashers and the DIY Network for making the experience so much fun! And to all of the contractors and subs who worked so hard to make it all happen.

For more information about this episode and future repeat episodes (just in case you missed it! Hehe) click on over HERE.

Wednesday, December 29, 2010

"Quick....I Need a Tablecloth!"


 What does one do when one needs a tablecloth and has a particular thing in mind.... no time and no funds? One idea.....make it oneself!

I have a different table in the Dining Room this year than last....the old one was a rectangle, and now it is round. This new (old) table may not be permanent since I think it is too small, but it is doing for now. I had a table cloth in mind....one with bold dark grey stripes. But I certainly did not have time to find it or have one made for the Holidays!

What to do in a pinch? Take out a trusty paint drop cloth....they are huge and very inexpensive....
 Buy some paint and a 9" roller from Home Depot. The 9" size was just about the right size for my stripes.....
 Spread out the drop cloth on top of another drop cloth....don't forget! The paint does seep through....
 If you would like things to be perfect, use painter's tape for making the lines straight. I chose to go a more casual route that ended up being a bit modern looking and "imperfect"...much less stressful! 

 And in one afternoon....I had the effect I was going for....I draped the table and tucked the extra edges underneath....
 Then the real fun of setting the table began! I have a pair of hand blown glass candelabras from Mexico...I used one for the center. I added gold chargers and my vintage Tiffany gold edged plates....I kind of liked the simplicity and was thinking to just stop here....but I kept on going.
 I added some Chinese green glazed plates and my new La Rochere Jacques Coeur wine and water glasses, white hotel napkins and silver....
 I made a boxwood "ball" using boxwood from the yard to put on the candelabra and some little mercury glass votive holders held more boxwood....


A few brass horns and pine cones from my Holiday stash....
Some votive candles, and Mother of Pearl salt dishes.....

All done!

Dinner at 8:00!

I hope you all had a wonderful Holiday!

Here's to a Joyful and Prosperous New Year!